AdvancedCQM (PM), Appointment Scheduler (EHR and PM), Chart Overview (EHR), Dashboard (EHR), Messaging History (PM), Patient Chart (EHR), Patient Messaging (PM/Patient Portal), Reports (PM), System Defaults (PM), Video Training Library (PM),
AdvancedCQM (PM)
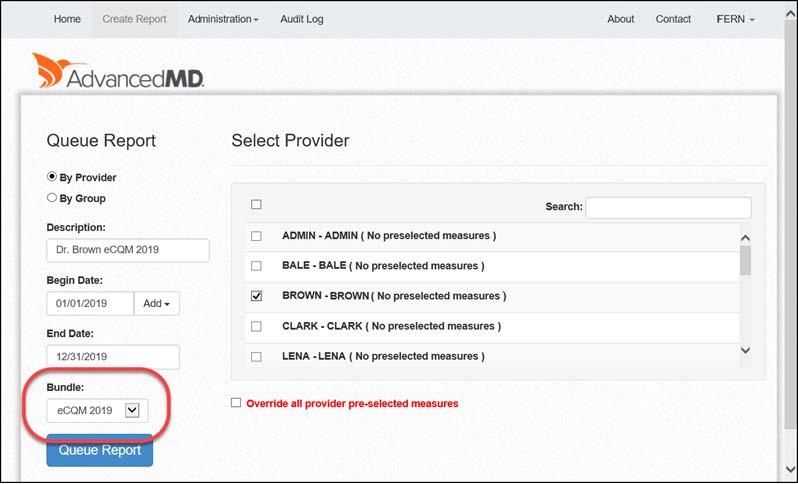
eCQM 2019 Report Bundle
The eCQM 2019 report bundle is now available in the AdvancedCQM module.
Use the eCQM 2019 bundle to assess quality measure performance, review measure logic, and view reports for 2019 eCQMs.
Important Note: CMS has updated and removed some of the Electronic Clinical Quality Measures (eCQMs) for the 2019 performance period. If the note or subnote that you used to report Quality Measures for 2018 has been removed, you cannot use it for the 2019 reporting period.
If the note or subnote that you used to report Quality Measures for 2018 has changed, we recommend that you visit the EHR Template Library and import the 2019 version. Updated templates are easily located under the eCQM 2019 – Changed from 2018 folder.
Below is a list of changes made by CMS that might affect templates in your system.
CMS has removed the following measures for 2019:
| CMS 65 | Hypertension: Improvement in Blood Pressure |
| CMS 123 | Diabetes: Foot Exam |
| CMS 158 | Pregnant women that had HBsAg testing |
| CMS 164 | Ischemic Vascular Disease (IVD): Use of Aspirin or Another Antiplatelet |
| CMS 167 | Diabetic Retinopathy: Documentation of Presence or Absence of Macular Edema and Level of Severity of Retinopathy |
| CMS 169 | Bipolar Disorder and Major Depression: Appraisal for alcohol or chemical substance use |
CMS has changed the following measures for 2019. We recommend that you import the new 2019 template from the template library.
| CMS 2 | Preventive Care Screening: Screening for Clinical Depression and Follow-up Plan |
| CMS 22 | Preventive Care Screening: Screening for High Blood Pressure and Follow-up Plan Documented |
| CMS 50 | Closing the Referral Loop: Receipt of Specialist Report |
| CMS 56 | Functional Status Assessment for Total Hip Replacement |
| CMS 66 | Functional Status Assessment for Total Knee Replacement |
| CMS 69 | Preventive Care and Screening: Body Mass Index (BMI) Screening and Follow-Up Plan |
| CMS 90 | Functional Status Assessments for Congestive Heart Failure |
| CMS 124 | Cervical Cancer Screening |
| CMS 125 | Breast Cancer Screening |
| CMS 127 | Pneumococcal Vaccination Status for Older Adults |
| CMS 129 | Prostate Cancer: Avoidance of Overuse of Bone Scan for Staging Low Risk Prostate Cancer Patients |
| CMS 130 | Colorectal Cancer Screening |
| CMS 131 | Diabetes: Eye Exam |
| CMS 134 | Diabetes: Medical Attention for Nephropathy |
| CMS 138 | Preventive Care and Screening: Tobacco Use: Screening and Cessation Intervention |
| CMS 139 | Falls: Screening for Future Fall Risk |
| CMS 142 | Diabetic Retinopathy: Communication with the Physician Managing Ongoing Diabetes Care |
| CMS 147 | Preventive Care and Screening: Influenza Immunization |
| CMS 149 | Dementia: Cognitive Assessment |
| CMS 153 | Chlamydia Screening for Women |
| CMS 155 | Weight Assessment and Counseling for Nutrition and Physical Activity for Children and Adolescents |
| CMS 159 | Depression Remission at Twelve Months |
| CMS 160 | Depression Utilization of the PHQ-9 Tool |
| CMS 165 | Controlling High Blood Pressure |
| CMS 645 | Bone density evaluation for patients with prostate cancer and receiving androgen deprivation therapy |
Go to Modules | AdvancedCQM.
Appointment Scheduler (EHR and PM)
We are happy to announce the following enhancements on the Appointment Scheduler screen:
- New System Default – Warn on Same Day Appointment (PM)
- New Patient Search screen (PM)
- New Search Options filter menu in Patient Search (EHR and PM)
- Copay amount added to Patient Information card (PM)
- Appointment Instructions added to the Appointment card (EHR and PM)
- Provider List view double-click functionality (EHR and PM)
- Fully grayed out non-work day columns (EHR and PM)
- Access Print View from the More options menu (EHR and PM)
Go to Utilities | System Defaults | Appointments.
New System Default – Warn on Same Day Appointment
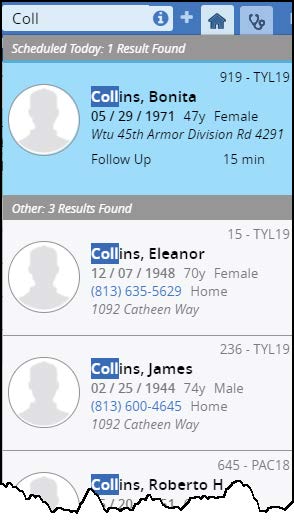
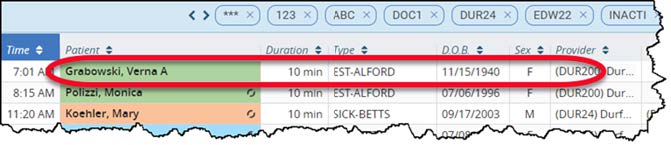
A new Patient Search screen is now available in Appointment Scheduler, and the New Appointments and New Group Appointments screens. Updated functionality includes:
- Search criteria is highlighted in the results column as it is entered.
- Additional patient detail displays in the results column
- Provider code.
- Phone and address information.
- Patient gender identity.
- Appointment type and duration.
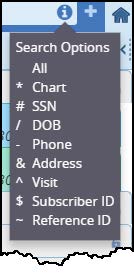
In addition, you can now use a new Search Options filter menu by clicking the information icon ![]() in Patient Search.
in Patient Search.
Copay Amount Added to Patient Information Card
The patient’s copay amount now displays on the Patient Information card.
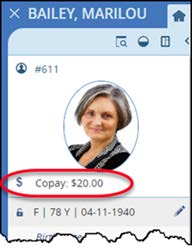
Note: The insurance copay corresponds to the insurance coverage assigned as the first to be billed in the Insurance Order field on the Insurance screen.
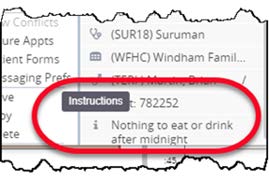
Appointment Instructions Added to Appointment Card
Appointment instructions assigned when making an appointment are now displayed on the Appointment card next to the Instructions icon.![]()
Provider List View New Double-Click Functionality
We are pleased to announce the addition of new double-click functionality in Provider List View screen in both PM and EHR.
- In PM, when you double-click on a patient name in the Provider List view, the Patient Information screen displays for the patient.
- In EHR, when you double-click on the patient name in the Provider List view, the system executes the action you have set for the Schedule – Double-Click on Appt Action user preference.
Fully Grayed Out Non-Work Day Columns
Non-work day columns now display fully grayed out on the Appointment Scheduler screen.
Prior to this update, only part of the non-work day column displayed grayed out.
Access Print View from More Options Menu
You can now access the Print View functionality from the More options menu.
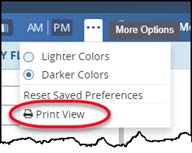
Chart Overview (EHR)
We have added a new Implantable Devices patient card and screen where you can view and manage implantable device information for patients.
Implantable Devices Patient Card
The Implantable Devices card displays a list of patient implantable devices with:
- Device
- Site
- Date implanted
Click the Infobutton ![]() to open the Device Details screen to view additional device information.
to open the Device Details screen to view additional device information.
Open a patient chart

Implantable Devices Screen
Use the Implantable Devices screen to add or edit implantable device information for a patient.
Open a patient chart | On the Implantable Devices card click the add icon. ![]()
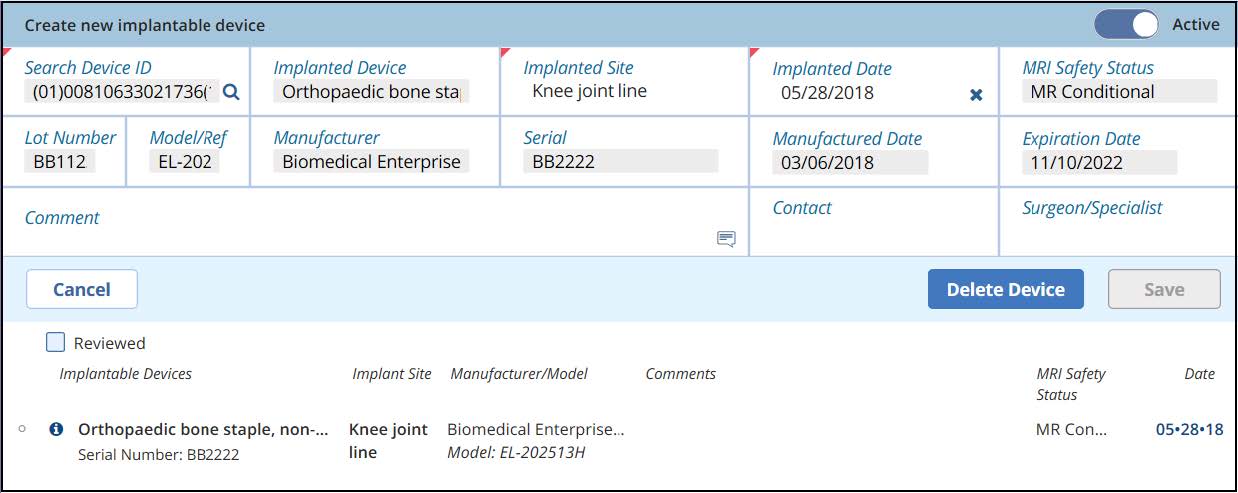
Add an Implantable Device
- Enter the device ID in the Search Device ID field and click the Search icon.
 When the device ID is found, other information about the device is automatically populated.
 - Make sure the device is set to Active.
- Enter any additional information, and click Save.
Dashboard (EHR)
Over the next few months we will be rolling out a new Pharmacy Requests feature that give you the ability to approve or deny electronic prescription renewal and change requests from the Dashboard.
For this update we have added the following:
- Pharmacy Requests donut and table to the Dashboard.
- Four new renewal and change request screens accessed from the Dashboard table.
- Renewal Requests
- Generic Substitution
- Prior Authorization
- Therapeutic Interchange
The legacy Rx Renewal Request and eSend Status screens are still available in the Tools menu.
Pharmacy Requests Donut Filter
The Pharmacy Requests donut filter displays the total number of renewal requests in the badge at the top, and the colors of the filter indicate the requests categories:
- Dark Blue – Refill requests
- Light Blue – Change requests
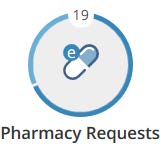
Pharmacy Requests Table
The Pharmacy Requests table displays information about renewal and change requests.
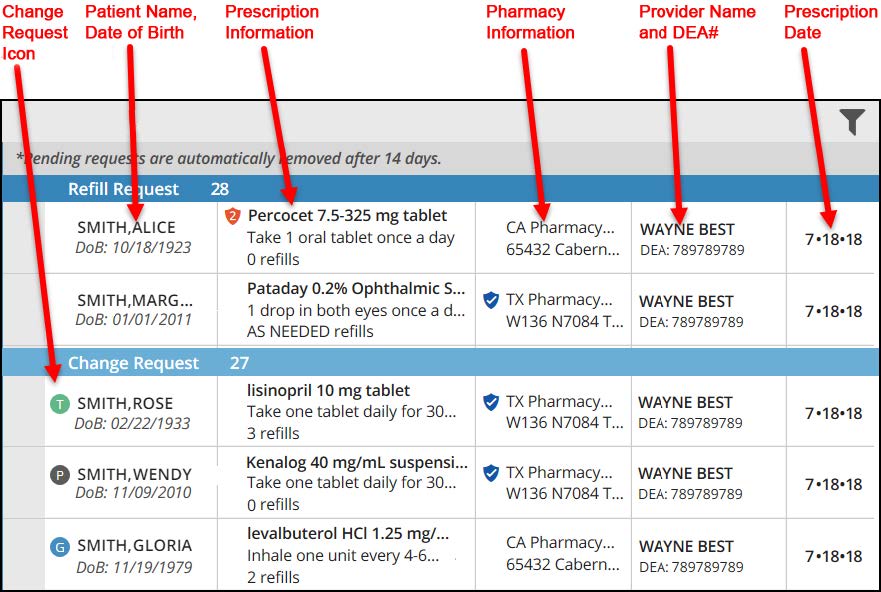
Use Renewal and Change Screens
The four new renewal and change request screens are specialized for the type of request, but are similar to the legacy Rx Renewal Request tool.
- Information sent from the pharmacy is on one side of the page.
- Information in EHR is on the other side of the page.
Edit information if needed and approve or deny the request.
Refill Renewal Requests Screen
The Refill Renewal Requests screen is where you approve or deny pharmacy requests for renewal of prescribed drugs, with no changes. Click a request on the Dashboard table under the Refill Renewal Request header to open the Refill Renewal Requests screen.
Change Requests Screens
There are three types of change requests, and three new screens where you can approve or deny them.
Click a request on the Dashboard table under the Change Request header and the appropriate screen opens.
Icons displayed on the change request indicate the type of change:
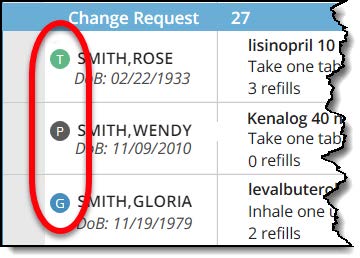
![]() – Opens the Generic Substitution screen.
– Opens the Generic Substitution screen.
![]() – Opens the Prior Authorization screen.
– Opens the Prior Authorization screen.
![]() – Opens the Therapeutic Interchange screen.
– Opens the Therapeutic Interchange screen.
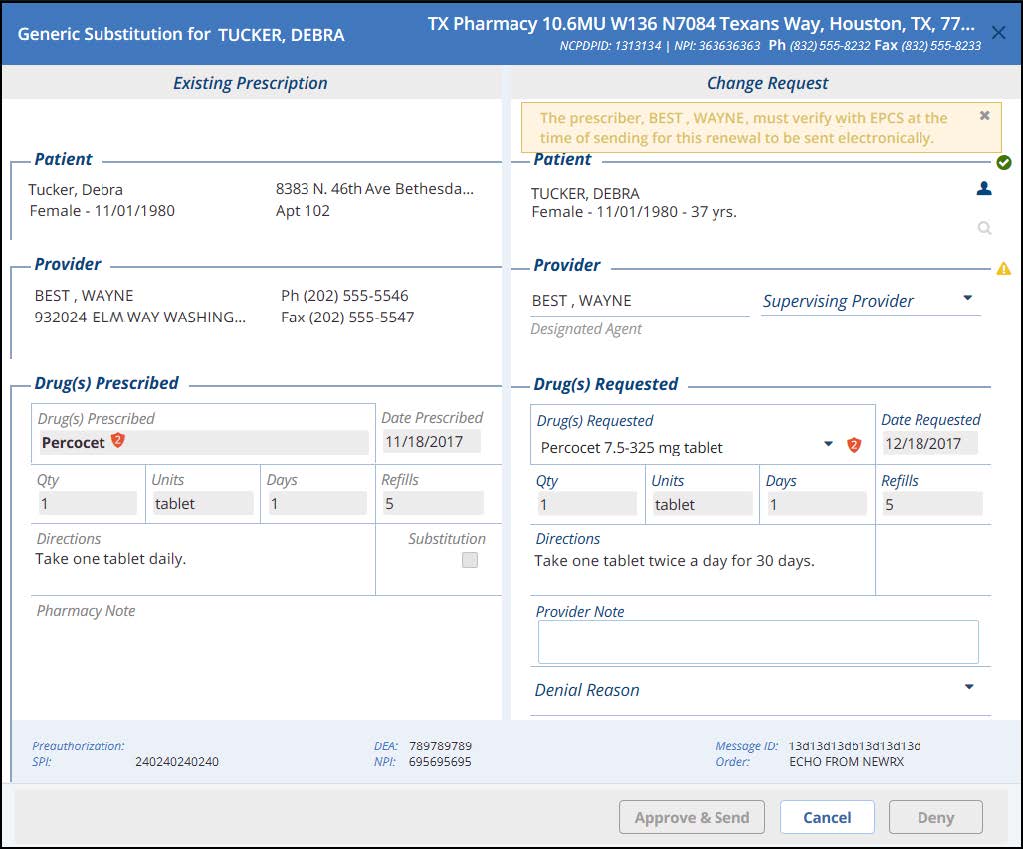
Generic Substitution Screen
The Generic Substitution screen displays pharmacy requests to substitute a generic drug for the name brand drug that was prescribed.
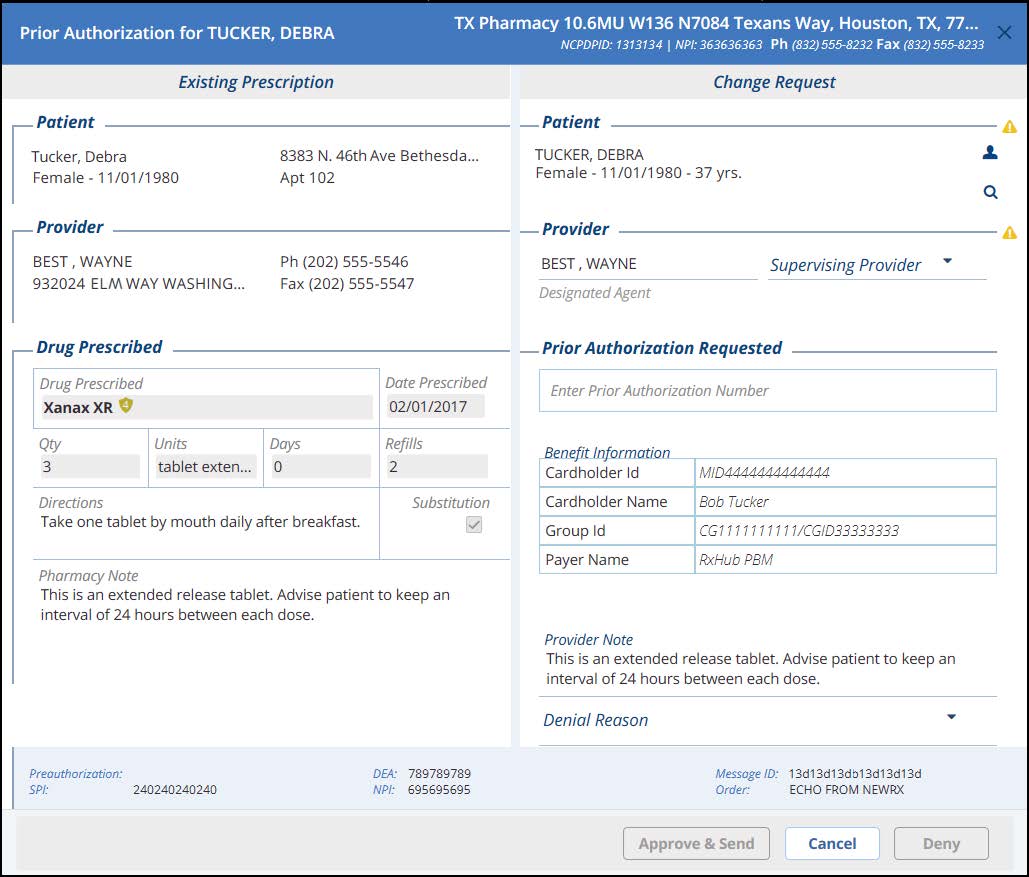
Prior Authorization Screen
The Prior Authorization screen displays drugs that require a prior authorization to prescribe.
Therapeutic Interchange Screen
The Therapeutic Interchange screen displays pharmacy requests to change the drug prescribed to a therapeutic alternative.

For additional information about the renewal and change request screens see the following help files:
Generic Substitution
Prior Authorization
Renewal Request
Therapeutic Interchange
Messaging History (PM)
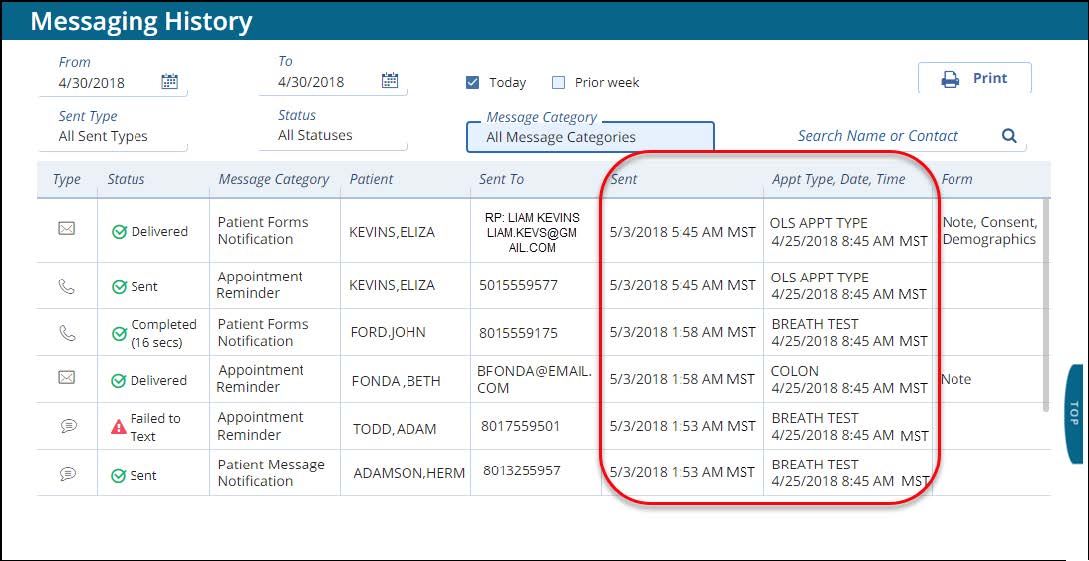
Time Zone
The Sent and Appt Type, Date, Time columns in the Messaging History screen now display the server time zone.
Patient Chart (EHR)
Next of Kin
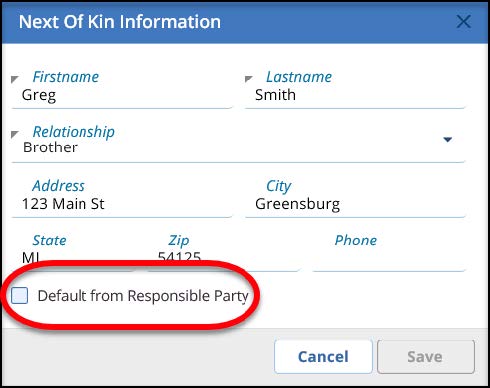
You can now auto-fill information from the Responsible Party tab in PM to the Next of Kin screen in the new patient chart. This feature makes it easy to assign a responsible party to patients who are getting immunizations.
Open a patient chart | On the Immunizations patient card, click the gear icon ![]() | Click Next of Kin.
| Click Next of Kin.
- Select Default from Responsible Party, and the patient’s responsible party information auto-fills from PM. The Relationship defaults to Guardian.
- Click the Relationship drop-down to select a relationship.
- Click Save.
Patient Messaging (PM/Patient Portal)
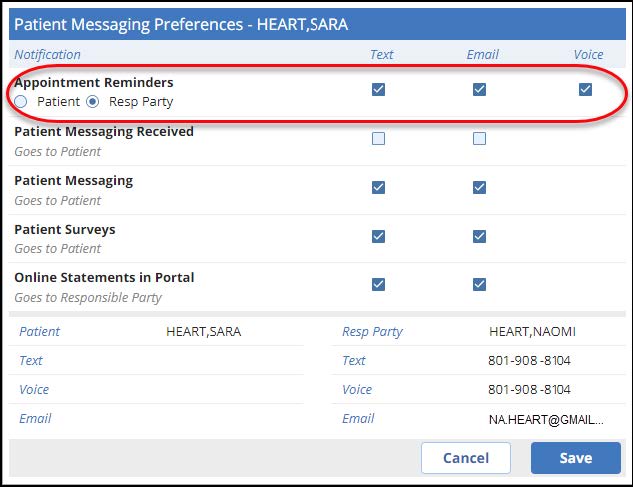
Responsible Party Update
Patient Messaging Preferences
You can now choose to send appointment reminders to either the responsible party or the patient. Use the new Appointment Reminders setting on the Patient Messaging Preferences screen to ensure the correct person, such as a parent of a pediatric patient, is aware of upcoming appointments.
Go to Demographics | Patient Info, or click the Patient icon. ![]()
Messaging History
Patient Portal account holders can also change messaging preferences for Appointment Reminders in the Patient Portal.
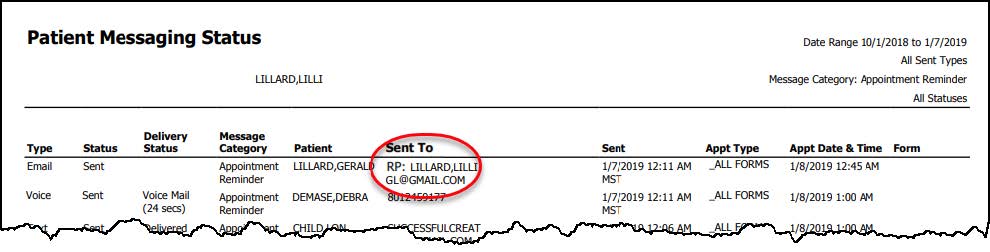
As part of the responsible party update, the Messaging History screen now displays the following additional appointment reminder information:
- Date and time the reminder was sent to the responsible party
- Responsible party name
- Responsible party contact information
In addition to the responsible party enhancement, we have also renamed the Contact column to Sent To for clarity. You can view who the notification was sent to in the Sent To column, and when the notification was sent in the Sent column.
Go to Modules | Patient Messaging | Messaging History.

Reports (PM)
Patient Messaging Status
As part of the responsible party enhancement, we have updated the Patient Messaging Status report to reflect if the message was sent to the responsible party.
We have also renamed the Contact column to Sent To to match the Messaging History screen.
Go to Reports | Patient Management | Patient Messaging Status.
System Defaults (PM)
You can now turn off the system warning that displays when making multiple appointments on the same day, by setting the new Warn on Same Day Appointment system default to No.
The default setting is Yes.
Go to Utilities | System Defaults | Appointments.

Video Training Library (PM)
The following videos have been updated:
- AdvancedPatient® – Appointment Reminders
Includes new language regarding the Responsible Party changes. - EDI Agreement Process
Includes updated screens and add correct verbiage.
Topic:
Content Type: