AdvancedPatient™ Pro, Immunizations (EHR), Master Files (PM), Medications (EHR), Patient Chart (EHR), Patient Portal (PM), Reports (PM), Video Training Library (PM), and Patches (PM/EHR)
AdvancedPatient™ Pro
Recall Reminder Templates
The enhanced recall appointment reminders module is part of AdvancedPatient Pro™. To purchase this module, contact Client Support Services.
Welcome to the enhanced Recall Appointment Reminders in PM! We have made the following enhancements to supplement the current recall functionality:
- You can send recall reminders to patients or responsible parties to remind them to schedule follow-up appointments or additional visits.
- You can create Recall Templates in the Automated Messaging & Reminders master file.
- You can tie Recall Templates to an appointment type in the Appointment Type master file.
- You can tie Recall Templates to an appointment type in the Provider Scheduler Setup master file.
Recall reminders are sent if the following criteria are met:
- Recall Reminder Template is tied an appointment type.
- The appointment type with the attached Recall Reminder Template is listed in the Recall Visits screen. Recalls are added to the Recall Visits screen through the current functionality of the recall feature.
Create Recall Reminder Templates
To begin using the enhanced Recall feature, first create your Recall Reminder Templates.
Go to Master Files | Templates | Automated Messaging & Reminders.
-
- Click the Add icon
 on the Recall Reminder Templates header.
 - Enter the Internal Template Name.
Note: The Internal Template Name is not seen by the patient.
- Enter the message content in the Email, Text, and Voice tabs.
Note:
Voice calls:- All voice calls are limited to two minutes.
- Voice calls are limited to 600 calls per provider per month. Calls exceeding this threshold could be subject to extra fees.
Text messages:
- You can enter up to 300 characters in the text message.
- If you send text messages over 160 characters, your reminders might be split into multiple messages. If the message is broken into multiple texts they can arrive out of order.
You must enter a message for each reminder type (email, text, and voice) to save the template.
The available length for text and voice messages is reduced to accommodate unsubscribe and confirm/cancel options. Additionally, merge field character count totals are included in the character limit. Addresses and names that exceed the estimated merge count length will reduce the allowable character count totals.
- Test the appointment reminder templates to ensure that names and numbers are pronounced correctly.
- Click Save.
- Click the Add icon
Set up Template Settings
After you have created your recall templates, you need to establish the Reminders Schedule for that template in the Template Settings screen. Use the Template Settingsscreen to customize settings for individual templates.

-
- Click the Template Settings icon
 on an individual template title.
 - Select Turn on Recall Reminders to enable sending the selected template.
- Select how many reminders to send: First recall, Second recall, Third recall.
- For each recall reminder selected (First, Second, Third), enter the number of Days, Weeks, or Months before the recall appointment is due.
For example, a patient needs to have a follow-up appointment on March 15, 2019, two weeks after a surgery. You enter the First recall setting 10 Days before the appointment is due. You enter the Second recall setting as 1 Week before the appointment is due. You set the Third recall as 3 Days before the appointment is due. The patient will receive recall reminders to schedule their appointment.The first recall reminder is sent on March 5, the second recall reminder is sent on March 8, and the last recall reminder is sent March 12.Notes:
When a patient schedules a recall appointment, the recall is removed from the Recall Visits screen.Appointments with recall reminders attached must be listed in the Recall Visits screen. The recall reminder intervals are determined from the RecallDue column in the Recall Visits screen.
- Select Spanish for Language Options to enable Spanish templates.
- Click Save.
- Click the Template Settings icon
Tie a Recall Reminder Template to an Appointment Type
Once you have created a recall reminder template, tie it to an appointment type. When an appointment type has a recall reminder template attached, recall reminders are
automatically sent to patients to remind them to schedule follow-up appointments or additional visits.
Go to Master Files | Appointments | Appointment Types.
- Create an appointment type as usual, or select a current appointment type.
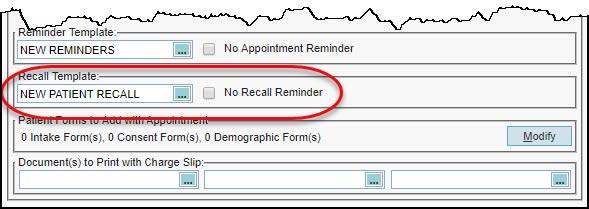
- Select the default recall reminder template for the appointment, or select No Recall Reminder check box if you do not want an appointment reminder to be sent for this appointment type.
Note: The Automated Messaging and Reminders master file is preloaded with an editable recall Default Template. This default template is assigned to the Recall
Template field for all current and new appointment types. You can change the Default Template and create custom recall reminder templates in the Automated Messaging & Reminders master file, or select No Recall Reminder.

Tie Recall Reminder Templates to a Provider Schedule
You can also attach a Recall Reminder Template in the new Recall Template field to an appointment type in the Provider Schedule Setup master file. When an appointment type has a recall reminder template attached, recall reminders are automatically sent to patients to remind them to schedule follow-up appointments or additional visits.
Important Note: The reminder saved for an appointment type in this master file will override the setting in the Appointment Types master file for the selected provider.
Go to Master Files | Appointments | Provider Schedule Setup.

Note: In the Appointment Types and Provider Schedule Setup master files, the Default Template in the Automated Messaging & Reminders master file is automatically attached to current and new appointment types in the Recall Template field. You can edit the Default Template, change the Recall Template for that appointment type, or select No Recall Reminder.
View the Enhanced Recalls Visits Screen
As part of the Recall Appointment Reminders enhancement, the Recall Visits screen includes the following additional functionality:
- Manually send recalls using the new Send Manually button on the Recall Visits screen.
- Click Go To Recall Templates to open Recall Templates in the Automated Messaging & Reminders master file.
- View additional columns:
-
- Type – The type of messaging format that was used to send reminders.
- E – Email
- T – Text
- V – Voice
- Sent – Status of the last recall reminder(s) sent.
Failed –
Sent –
- Sent Date – Column includes how many times recall reminders were sent (if you send email, text, and voice twice, this number will be 6), and the date the last reminder was sent.
- Log – View recall reminder history in the Messaging History screen for the selected line.
- Type – The type of messaging format that was used to send reminders.
-
Note: You can only send one manual recall reminder per day for a selected patient.
Go to Tasks | Recalls.

View Recall Enhancements in the Messaging History Screen
You now search for Recall Reminders from the Messaging Category field in the Messaging History screen.
Go to Modules | Patient Messaging | Messaging History.

Immunizations (EHR)
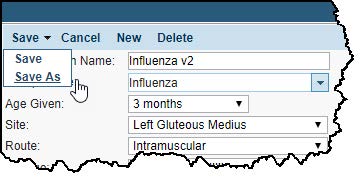
You can now copy an existing immunization to set up a new immunization, by using the new Save As button.
Go to Admin | System Setup | Immunizations.
- Select an immunization.
- Update fields as needed.
- Click Save As.
- Enter the name of the immunization.
- Click Save.
The new immunization displays on the Immunizations Setup list.

Master Files (PM)
Facilities
Include Facility in Address & Directions
You can now enable facilities to display in the Address & Directions Locations screen in the Patient Portal.
Important Note: Existing facilities with a future appointment tied to them will automatically be opted in to display in the Patient Portal. If a facility is not associated with a future appointment, you must manually opt them in to display in the Patient Portal. New facilities must also be manually opted in.
Set Up Facilities to Display in Patient Portal
To enable facilities to display in the Address & Directions Locations screen in the Patient Portal, the facility must have the Include in Portal option set to Yes.
 Go to Master Files | Facilities.
- Select an existing facility, or create a new facility as usual.
- Select Yes for the Include in Portal radio buttons to include the facility in the Address & Directions Locations screen in the Patient Portal.
- Click Click Save.
Medications (EHR)
Import Medications History
We have updated the Import Medication History screen so refill information displays for medications when available.
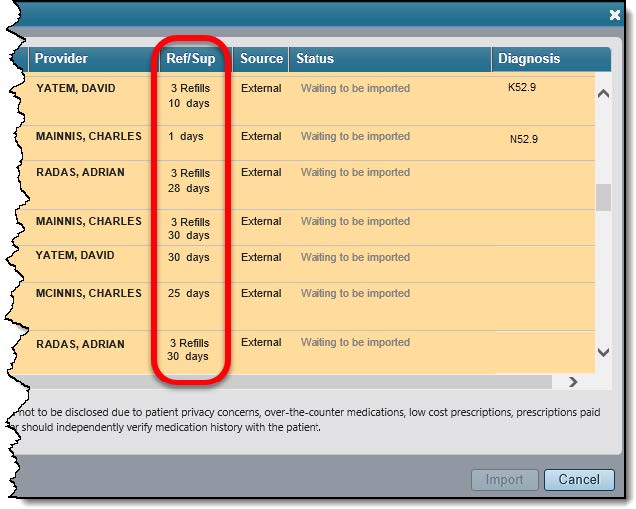
Open a patient chart and go to the Medications tab | Import. ![]()
Patient Chart (EHR)
Problem Onset Date Restricted
We have updated the problem Onset Date, so problems with a Current Status can have an Onset Date from the past though today, and problems with an Historical Status can have an Onset Date before or on the Status Change Date.
Note: Problems cannot have an Onset Date in the future.
Classic EHR
- Go to a patient’s chart | Summary tab and click Problem List.
EHR
- Click the add icon
on the Problems card.

Patient Portal (PM)
Address & Directions Enhancement
We have enhanced the Address & Directions Locations screen in the Patient Portal with the following updates:
- The Address & Directions Locations screen displays all facilities enabled in the Facilities master file.
- When logged in to the Patient Portal, the facility location for the next upcoming patient appointment displays, followed by other locations.
- View the facility’s location on Google™ Maps by clicking Open Google Maps.
Important Note: Existing facilities with a future appointment tied to them will automatically be opted in to display in the Patient Portal. If a facility is not associated with a future appointment, you must manually opt them in to display in the Patient Portal. New facilities must also be manually opted in from the Facilities master file.

Reports (PM)
Custom Patient Receipt
Filter by Single Patient
You can now filter the Custom Patient Receipt report with the new Filter by Single Patient. Use this filter to limit your search to an individual patient.
Go to Reports | Report Center | Receipts.

Video Training Library (PM)
The following videos have been updated:
- Managing Recalls
Includes the AdvancedPatient Pro™ automatic recall appointment reminders. - AdvancedMobileDoc™ – Nurse and MA Patient Visit Workflow
Includes enhancements to the Rx import feature.
Patches (PM/EHR)
- Issue 13545 – Updated bookmarks to fix problem transferring immunization information to notes and text documents.
- Issue 13404 – Fix for a specific key where you couldn’t print a patient chart.
- Issue 13416 – Sub-notes added to saved patient notes now save with correct time zone.
- Issue 13660 – Fix for a specific key where you couldn’t save a note template.
- Issue 13549 – Fix for a specific key where you couldn’t edit a visit on the Patient History screen.
- Issue 13670 – Restored ability to verify phone number for patient messaging and voice confirmations.
- Issue 13326 – Restored ability to delete unverified Outgoing Phone Number, verified phone numbers marked as verified.
- Issue 13599 – Restored ability to verify Outgoing Phone Number when the line has an extension (IVR).
- Issue 12407 – Resolved Internal Server Error for AdvancedMessaging Campaigns.
- US 157975 – Fixed JS error when saving Patient Notes when using Notes version 2.
Topic:
Content Type: