AdvancedCQM (PM)
We are excited to announce the following updates to the AdvancedCQM module:
- Group Code information.
- Ethnicities and multiple races support.
Group Code
We have added a Group Code column on the Groups screen, so you can easily determine the difference between groups that have the same name.
Note: Users with the Multiple Provider Report privilege for AdvancedCQM in Role Setup have access to the Administration tab, where you can edit users and groups.
Go to Modules | AdvancedCQM | Administration | Groups.

Ethnicities and Multiple Races
We have also updated the AdvancedCQM module to support ethnicities and multiple races in reports.
Notes:
- On the Details tab, races other than Declined to Specify are rolled up into one of the following six categories: American Indian or Alaska Native, Asian, Black or African American, Native Hawaiian or Other Pacific Islander, White, or Other Race.
- If a patient selects multiple races, Other Race will display on the report.
- On the Details tab, ethnicities other than Declined to Specify or Other are rolled up into one of the following two categories: Hispanic or Latino, or Not Hispanic or Latino. Declined to Specify and Other will not display in any category.
Go to Modules | AdvancedCQM | report Detail tab.

AdvancedReputation (PM)
Reputation Management Templates
Use the Reputation Management Template in the Automated Messaging & Reminders master file to personalize the Survey Template. Reputation management surveys are sent to patients so they can rate your practice and give feedback on their experience.
Important Note: Including certain merge fields could disclose Protected Health Information (PHI). Review HIPAA requirements when communicating with patients.
Note: Provider and Facility related merge fields populate information based on the provider or facility related to the appointment.

Go to Master Files | Templates | Automated Messaging & Reminders.
In this help file, you will learn about:
-
- Default Template Wording
- Testing a Reputation Management Survey Template
- Editing a Reputation Management Survey Template
- Setting up a Spanish Template Settings
Default Template Wording
The Survey Template for Reputation Management Templates has default English and Spanish templates for email and text.
- Select the tab you want to change back to the default wording (Email or Text).
- Click Default Template Wording.


Note: Clicking Default Template Wording restores the message for the open tab (Email or Text).
Testing Reputation Management Survey Template
You can test the reputation management survey template in the Automated Messages & Reminders master file to ensure it is formatted correctly and meets the length requirement for emails and texts.
Note:
- The name of the Test Email/Text button changes, depending on which template tab is selected (Email or Text).
- The merge field data included in test appointment reminders is system test data and cannot be changed.
- Select a template.
- Select the Email or Text tab.
- Click Test Email/Text. The Send Test Email/Text Message screen displays.
- Select the Email or Text tab.
- Enter a Test Email/Phone Number.
- Enter a Test Patient Name, if necessary.
- Enter a Test Practice Name, if necessary.
- Click Test Email/Text.
Editing Reputation Management Survey Template
You can customize and edit the Survey Template to fit your practice.
Note:
- You must include the Survey link or a 5 Star Survey merge field in the message to save the template.
- Text messages:
- You can enter up to 300 characters in the text message.
- If you send text messages over 160 characters, your reminders might be split into multiple messages. If the message is broken into multiple texts they might arrive out of order.
- You must enter a message for each reminder type (email, text, and voice) to save the template.
- The available length for text and voice messages is reduced to accommodate unsubscribe and confirm/cancel options. Additionally, merge field character count totals are given an estimated length. Addresses and names that exceed the estimated merge count length will reduce the allowable character count totals.
 Select the Survey Template.
- Edit the message content for Email and/or Text.
- Test the appointment reminder templates to ensure that names and numbers are pronounced correctly.
- Click Save.
Setting up Spanish Template Settings
Use the Template Settings screen to enable sending surveys in Spanish to patients who have Spanish set as their Preferred Language on the Patient Information screen.
Note:
- If you have Spanish-language templates enabled, but did not fill out the body, reminders will automatically send the English-language template.
- Spanish-language templates must be written in Spanish.

- Click the Template Settings icon.

- Select the Spanish check box for Language Options.
- Click Save.
- Enter the Spanish-language template body for each survey type (Email and Text).
- Click Save.
- Use the Send Test Message feature to test the pronunciation of your voice reminder in Spanish.
Charge Detail (PM)
You can now hover over the Type on the Insurance Billed table to view the claim run number.
Click the Patient icon ![]() and select the History tab.
and select the History tab.

Chart Header (EHR)
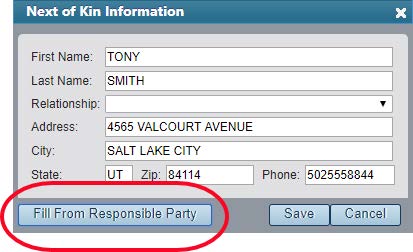
You can now autofill the Next of Kin screen with information from the Responsible Party tab using the new Fill From Responsible Party button.
Select a patient and open the Chart Header | click Next of Kin.
- Click the Fill From Responsible Party button.
- Select an entity from the Relationship drop-down.
- Click Save.
Global Settings (PM/EHR)
Atlantic Standard Time Zone
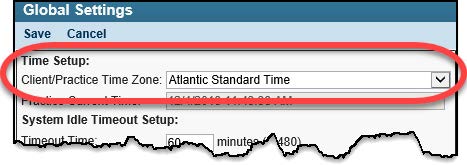
You can now select Atlantic Standard Time in the Client/Practice Time Zone drop-down in Global Settings.
EHR Users
Go to Admin | System Setup | Global Settings.
PM Users
Go to Modules | ePrescribing | Preferences icon ![]() | Global Settings.
| Global Settings.
Immunizations (EHR)
We are happy to announce several enhancements to the Immunizations process:
- New Lot Codes Screen
- Enhanced Workflow
- Streamlined Patient Immunization Report
Immunizations Setup
New Lot Codes
Use the new Lot Codes screen, on the Immunizations Setup screen, to enter and track multiple vaccine lot codes when you set up private or VFC immunizations.
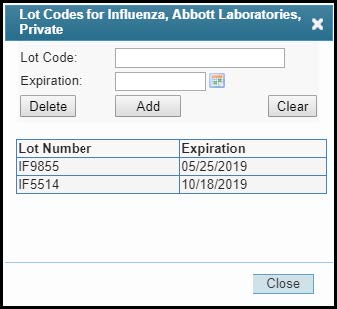
To access the new Lot Codes screen, click the new Add/Edit button.

Add Multiple Lot Codes
Go to Admin | Setup | Immunizations.
- Select an immunization.
- Click Add/Edit for the Lot Number field.
- Add the Lot Code number and Expiration date and click Add.
- Click Close.
Note: To update or delete an entered lot number, select the lot number in the grid, make the update, and click Update or Delete.
Recording Immunizations
Select a patient | click the Immunization icon ![]() on the Patient Chart toolbar to access the Recording Immunizations screen.
on the Patient Chart toolbar to access the Recording Immunizations screen.
Enhanced Workflow
- When the Exclude from State Registries check box is selected, the system ignores required settings in Global Settings | Immunization Setup, and you can save the
record without the complete set of fields required for a state registry immunization record. - When an you enter an immunization Route as Oral, the system no longer requires a Site to be entered before saving an immunization record.
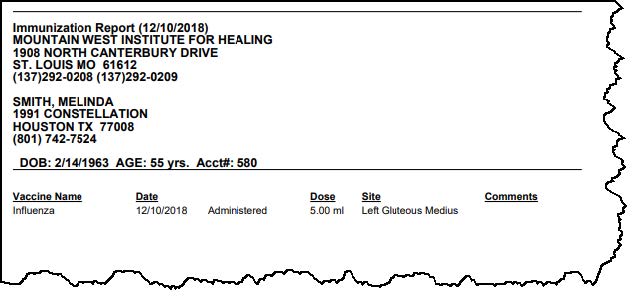
Streamlined Patient Immunization Report
We have streamlined the patient immunization report to only include the following information required to show proof of vaccination for the patient:
- Vaccine Name
- Date (Administered)
- Dose
- Site
- Comments
Master Files (PM)
Automated Messaging and Reminders
Reputation Management Templates
You can now customize the Survey Template for the new Reputation Management Templates in the Automated Messaging & Reminders master file.

Go to Master Files | Templates | Automated Messaging & Reminders.
Additional Merge Fields
You can now select additional merge fields for templates in the Automated Messaging & Reminder master file. We have added merge fields to the following templates:
- Updated for Appointment Reminder and Reputation Management Templates:
- Patient Title
- Patient First Name
- Patient Last Name
- Updated for Appointment Reminder Templates:
-
- Facility City
- Facility State
- Facility Zip
-
Go to Master Files | Templates | Automated Messaging & Reminders.
Social Media Review Links
Facebook Reviews
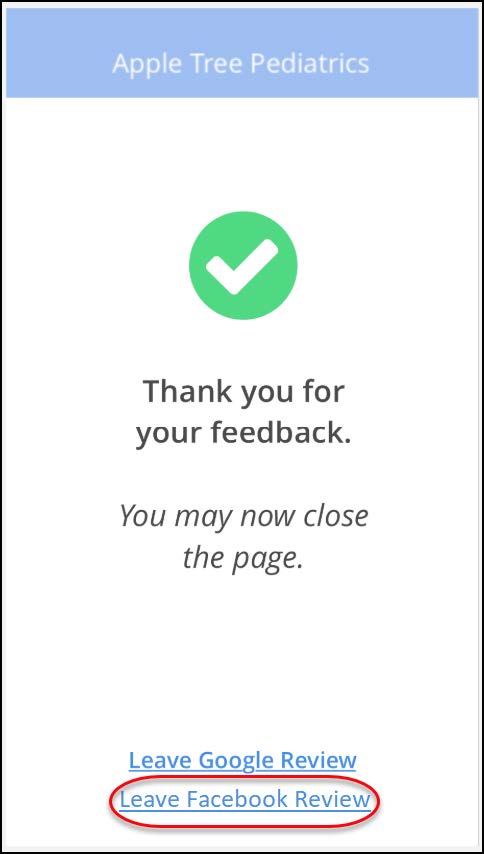
Patients can now leave a Facebook review from the reputation management survey for scores of 1-3 stars.
Mobile App Updates (Mobile)
We are excited to announce the following updates to our mobile and iPhone® apps:
- View day of the week on iPhone® Schedule.
- Add blocks and view blocks and holds in the Schedule while in Provider View.
- Create and edit text documents.
- Use new patient note navigation.
iPhone Schedule
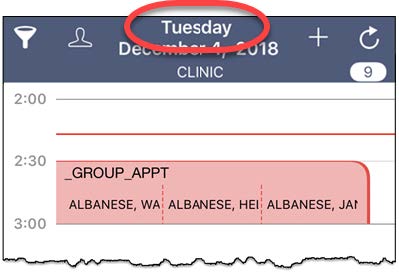
You can now view the day of the week on the iPhone Schedule, so you can easily see which day the appointments take place.
Blocks and Holds
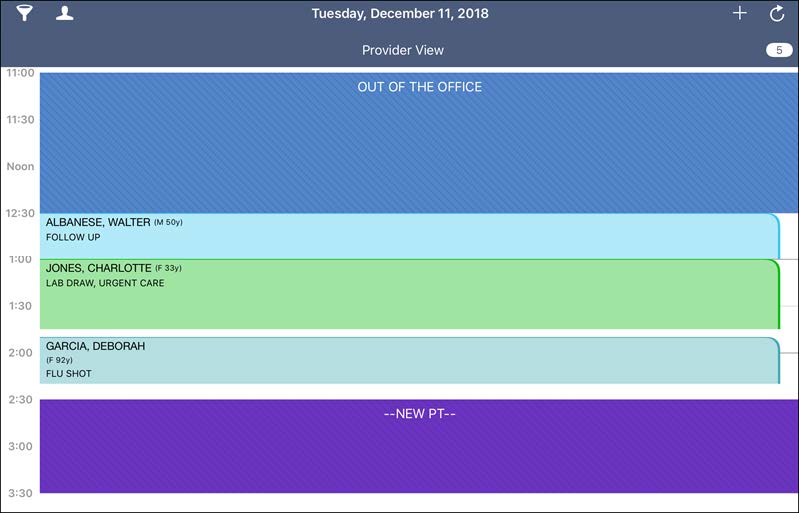
You can now add blocks, and view all blocks and holds for any of the provider profiles associated with your user while in Provider View in the Schedule.
Note: You must be logged in as a provider to see this view. Tap the Provider View icon.
Text Documents
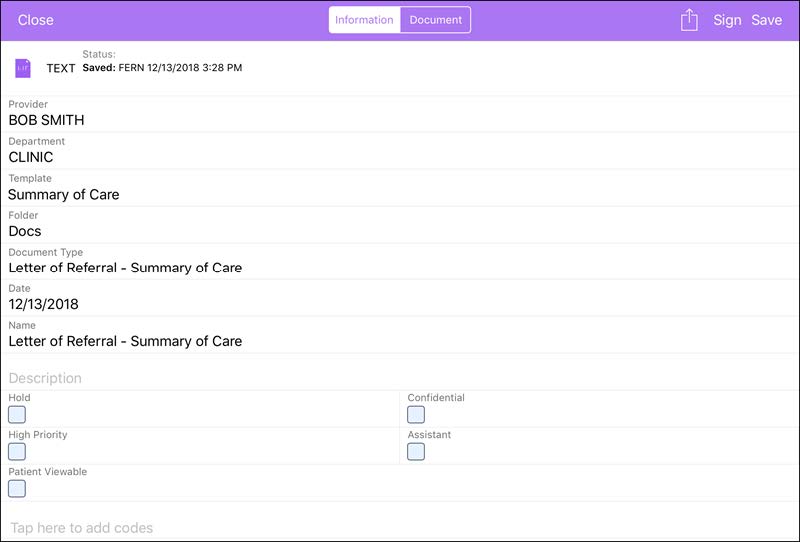
In response to EVO 2018 feedback, you can now create and edit short documents as needed, or add a standard text document that has been saved as a template, just as you can in EHR. The mobile app also includes an enhanced text editing toolbar.
Notes:
- If you have not entered a document Name, the name will automatically populate as the type when you select a Document Type.
- The Folder field displays the default folder set up in EHR Admin | System Setup | Default Folders.
- The Folder can be changed after a document has been signed.
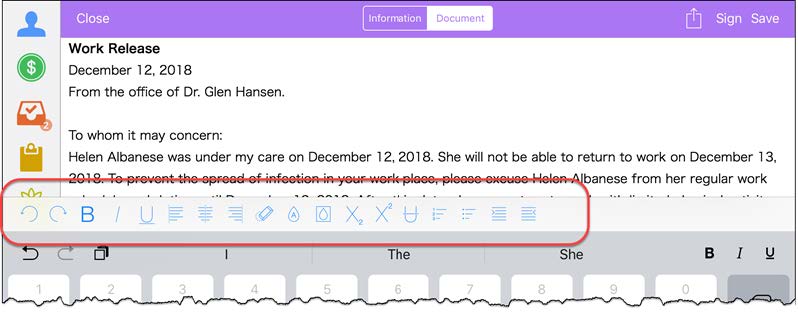
Tap the add icon + on the patient’s Documents and Images list and then tap Text Document.
- Enter any necessary information on the Information tab.
- Select a Template if you want to add a standard text document, or leave blank to create a new document.
- Tap the Document tab.
- Edit the document as necessary.
- Tap Save.
- Tap the Action icon
 to Review, Print Preview, Add Signers, Route/Send Message, Add Linked Item, or Delete the document.
 - Tap Sign.
Patient Notes Workflow
We have updated mobile app patient notes with a new and improved workflow. Use the new Notes toolbar to navigate and update fields.
This feature will be released in stages over the next few months.
Tap a field in the patient note to open the Notes toolbar.
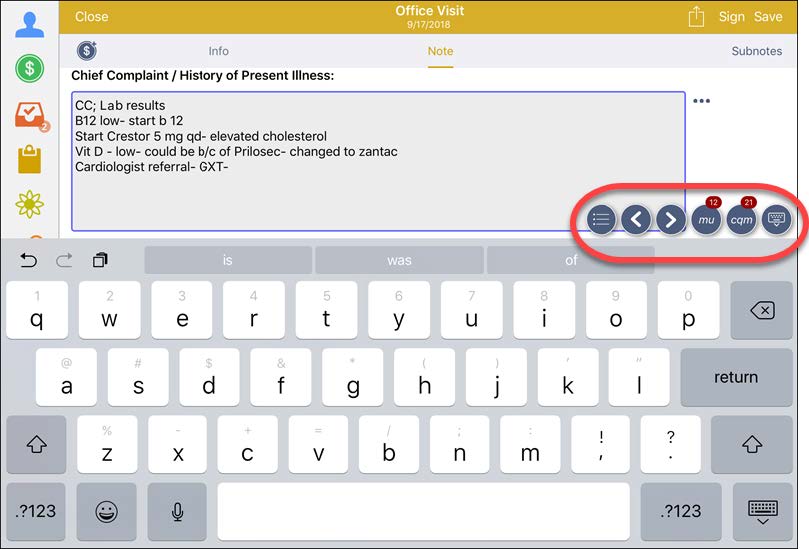
Toolbar Icons:
 – Open the keyboard
 – Close keyboard
 – Navigate through the note to CQM fields. The icon displays a badge to indicate how many CQM fields are in the note.
 – Navigate through the note to MU fields. The icon displays a badge to indicate how many MU fields are in the note.
 – Go to the next field in the note.
 – Go to the previous field in the note.
 – Switch from the keyboard to view and select field options.
Note: Notes toolbar icons only display if they are relevant to the note and fields. For instance, if there are no CQM fields in the note, the CQM icon will not display.
Patient Chart (EHR)
Patient Folder
We have updated the Patient Folder so now chart items indicate hold/priority.
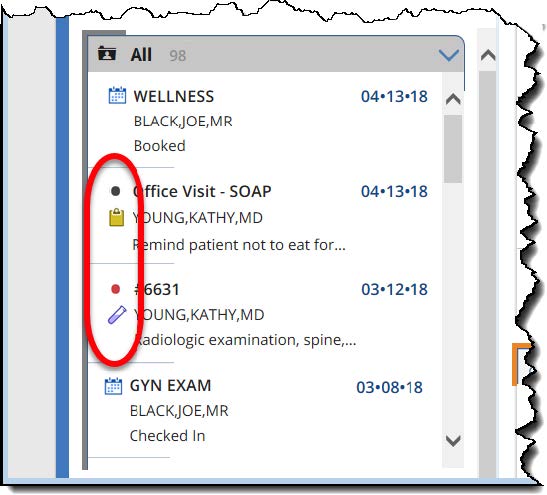
![]() – Indicates item is marked as priority.
– Indicates item is marked as priority.
![]() – Indicates item is marked as held.
– Indicates item is marked as held.
Patient Cards
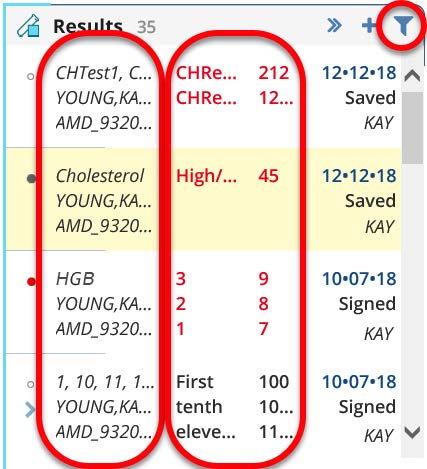
We have rearranged the information that displays on the Results patient card and added new information.
- The left column displays test name, provider and lab accession number.
- The middle column displays result name, range/out of range information.
We have also updated the filter on the Results patient card so you can now select to view multiple results on the card to compare them.
Patient Portal (PM/EHR)
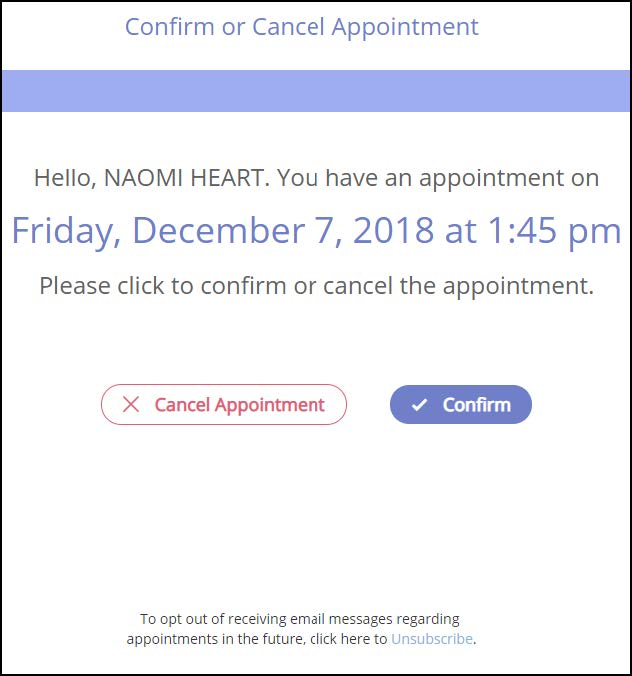
Update Arrival Time for Confirm and Cancel
The Confirm or Cancel Appointment screen in the Patient Portal will not display the arrival time as their appointment time when you enter the Arrival Time merge field in
Appointment Reminder templates. This helps patients to arrive at the scheduled arrival time for appointments.
Tools (EHR)
Signoff Preferences
We have added a new Create Pre-filled Charge Slip preference for Patient Notes. When the preference is selected, a new pre-filled charge slip opens after you sign a patient note.
Go to Tools | User Preferences | Signoff.

Video Training Library (PM/EHR/Mobile)
The following video has been added to the Video Training Library:
- Prescription Renewal Requests
In this video, we demonstrate prescription renewal workflow scenarios to help you effectively manage requests from patients or pharmacies. This video introduces the new Pharmacy Requests donut on the EHR Dashboard. This training video replaces ePrescribing Refills and Renewals.
The following videos have been updated:
- AdvancedMobile™ – Renewals and eSend Status
Updated with the latest version of the app. - EHR Charge Slip
Updated to include the new EHR User Preference that automatically opens the pre-filled charge slip once the patient visit note is signed. - Patient Health Education
Updated to be aligned with the 2019 MACRA MIPS PI regulatory requirements. - Scheduling Workflow – Day of Patient Visit
Updated video to include Provider List View in the PM scheduler.


 Select the Survey Template.
 – Open the keyboard
 – Close keyboard
 – Navigate through the note to CQM fields. The icon displays a badge to indicate how many CQM fields are in the note.
 – Navigate through the note to MU fields. The icon displays a badge to indicate how many MU fields are in the note.
 – Go to the next field in the note.
 – Go to the previous field in the note.
 – Switch from the keyboard to view and select field options.