Welcome to the 21st century’s version of a house call. AdvancedTelemedicineTM provides a secure way for providers to communicate with patients remotely so they can provide better care and flexibility.
The telemedicine appointment can take place with the following devices:
- PC
- MAC®
- SurfaceTM PRO 2 running Win 8.1 or Win 10
- iOS devices
- Android devices
- Blackberry devices
AdvancedTelemedicine is an add-on module. To order AdvancedTelemedicine, contact our Client Sales team at 801-984-6138.
Setup
System Requirements
Both provider and patient must have the following to join a Telemedicine session:
- Internet connection
- Speakers
- Microphone/headset
- Webcam
Role Setup
Make sure your providers have the appropriate permissions assigned to them to use the AdvancedTelemedicine module.
There are three privileges associated with Telemedicine:
- Charge Visits – Allows the user to charge for Telemedicine visits
- Edit Settings – Allows the user to make changes to the settings in the Telemedicinemodule
- Make Calls – Allows the user to make calls in the Telemedicine module
- View Visits – Allows the user to view visits in the Telemedicine module
Assign Provider Profile to Provider’s User Account
In order for providers to use the Telemedicine module, make sure that the provider’s profile is assigned to the provider’s user account in User Setup.
Note: A provider can be assigned to only one user, so be sure that the provider’s profile is assigned to his own user login.
Go to Utilities | User Setup.
1. Select the provider from the user list.
2. Select the provider’s name from the Provider drop-down.
3. Click Save.
Enter Provider Email
All providers using the Telemedicine module must have an email listed in their respective Providers master file record and in User Profile.
Note: The provider must be logged in to PM using their user name to enter their email in User Profile.
Enter Patient Email
Prior to the telemedicine appointment, ensure that the patient’s email is entered in the patient’s record in Patient Information.
Click the Patient icon.
1. Enter the Patient Name.
2. Enter the patient’s Email.
3. Click Save.
System Defaults
Prior to using Telemedicine, you need to set the Telemedicine default charge amount system default. In order to charge a fee for the telemedicine visit, the office key is required the have an agreement with OpenEdge® for credit card processing. Once an agreement is established, enter the default charge for telemedicine appointments in the Telemedicine default charge amount system default.
Go to Utilities | System Defaults.
1. Select Transaction Entry.
2. Enter the default charge amount for telemedicine appointments.
Appointment Type Setup
You can create appointment types specifically for telemedicine appointments, and when you select one of those specific appointment types in the Make Appointment screen, the Telemedicine check box will be selected by default. When the appointment is scheduled, an email will be sent to the patient with instructions on how to join the telemedicine visit. You can also mark any appointment as a Telemedicine appointment at the time you create the appointment.
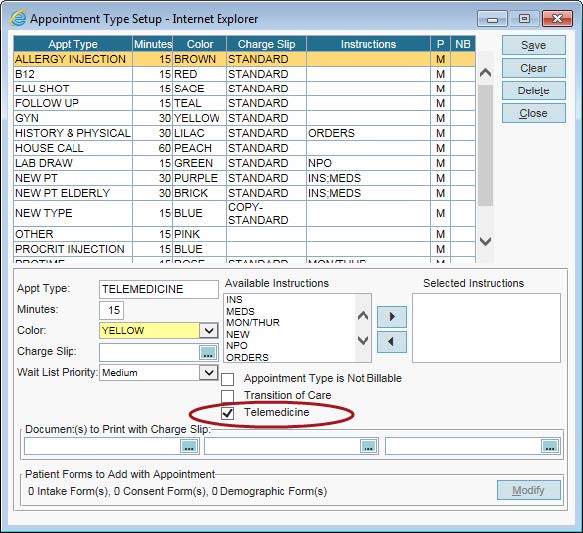
Go to Master Files | Appointments | Appointment Types.
1. Select an appointment type or create a new appointment type for telemedicine.
2. Select the Telemedicine check box.
3. Click Save.
Telemedicine Settings
Before you can make your first telemedicine appointment, you will need to create a template for your confirmation and reminder emails. You will also need to enter basic practice information, as well as settings for telemedicine visits such as how many minutes prior to the visit the patient can join the session, and if you will charge patients at the time of the visit.
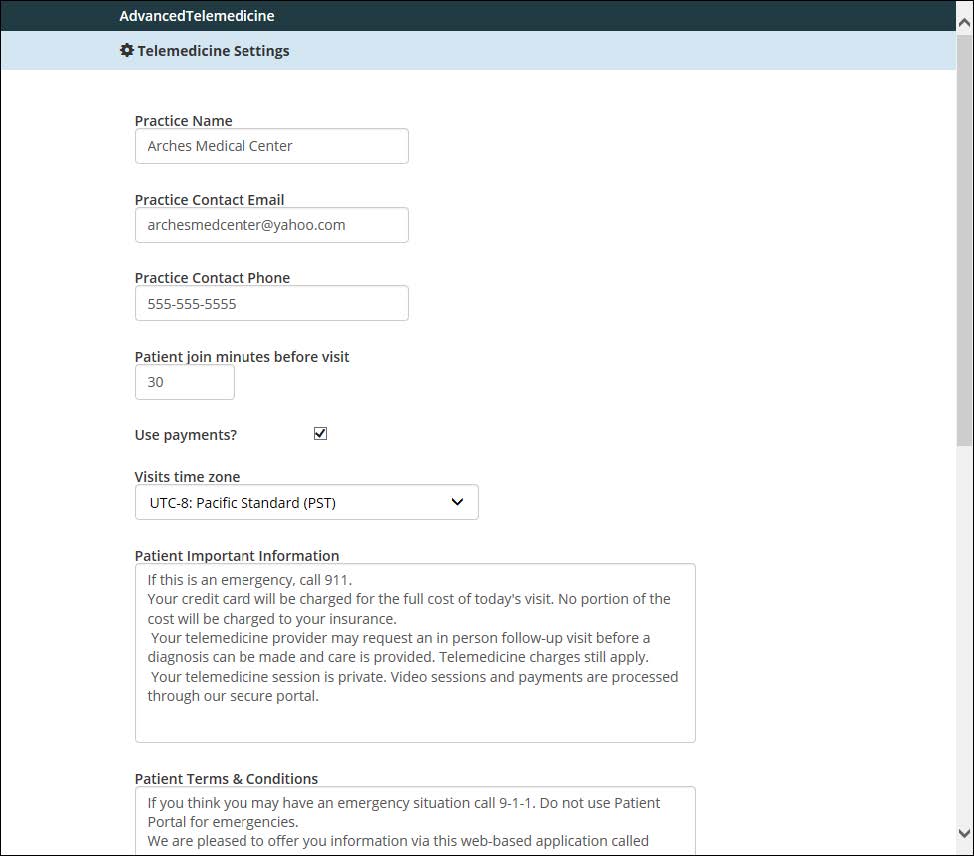
Go to Modules | Telemedicine.
1. Click the Settings icon.
2. Enter the Practice Name, Practice Contact Email, and Practice Contact Phone number.
3. Enter how many minutes prior to the visit the patient can join the session.
4. Select the Use payments check box if you want to charge patients at the time of the visit. Clear the check box if you plan on sending a claim to the insurance or sending a statement to the patient after the appointment.
5. Select your Visits time zone.
6. Indicate if you want to Use daylight saving time.
7. Enter Important Patient Information. This information will appear on the Important Information page.
8. Enter Patient Terms & Conditions. These are the terms and conditions the patient will accept prior to entering the waiting room for the teleconference.
9. Enter the Email Subject for the confirmation email that will be sent to patients.
10. Enter the text for the confirmation email in the Patient Email Template box.
11. Enter the Appointment Subject for the appointment reminder email that will be sent to patients.
12. Enter the Appointment Location for the reminder email. This is the link that will be sent for the appointment in the confirmation and reminder emails
13. Enter the text for the appointment reminder email in the Appointment Template.
14. Click Save.
15. Click Go to Visits to return the Telemedicine appointments screen.
Front Desk
Schedule a Teleconference with a Patient
Note: Before you schedule a teleconference with a patient, ensure that the provider’s and patient’s email are correct.
1. Make an appointment in the Appointment Scheduler.
2. In the Make Appointment screen, select the Telemedicine check box.
Note: You can create a telemedicine appointment type in the Appointment Type master file, and when you select the appointment type, the Telemedicine check box will be selected by default.

3. When you click OK , an email will be sent to the patient’s email address from the patient demographics screen.
4. Inform the patient of the system requirements listed above.
Provider
View Scheduled Teleconferences
Go to Modules | Telemedicine.
1. Click Start Call for the next patient waiting in the queue to begin the teleconference.
2. Click Join Session.
3. When the call is complete, click End Call.
4. Click Charge to charge the patient’s credit card.
5. If you will not be charging the patient for the visit, click No Charge and enter the reason you will not be charging the patient.
Note: The charge will be recorded as an unapplied payment and will later need to be applied to the visit.
Patient
Scheduling a Teleconference Appointment
The patient makes an appointment with his physician and informs the scheduler he would like to schedule a teleconference.
After making the appointment, the patient will receive an email from the practice.
Entering the Teleconference
You can use AdvancedTelemedicine from a PC or from an iPhone® or iPad®.
Note: If you are using a PC, install the telemedicine plugin (first time only). If you want to join the session from an iPhone or iPad, download the app from the Apple store.
1. On the main Telemedicine screen, enter the appointment code received in the telemedicine confirmation email.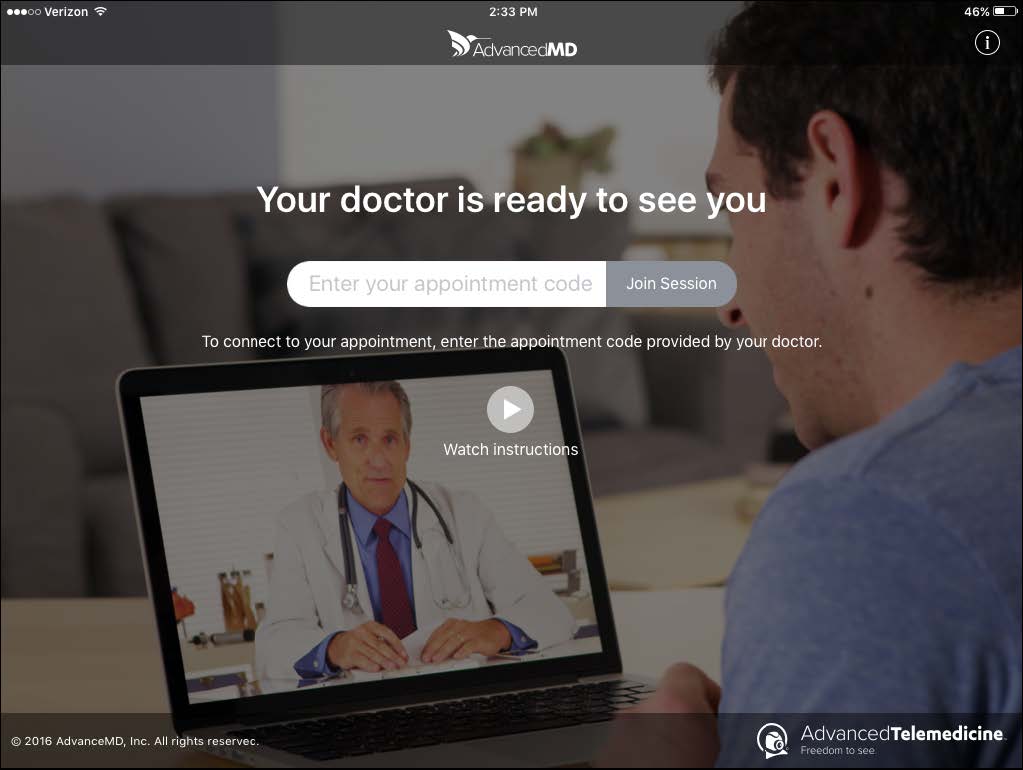
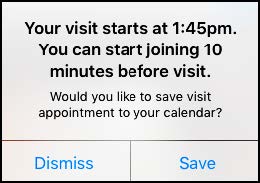
Note: The patient can join the telemedicine session prior to the visit the number of minutes you set in the Settings screen. If the patient tries to join the telemedicine session more than ten minutes prior to the session, they will receive a message reminding them of the appointment time and allowing them to add an appointment to the calendar on their mobile device.
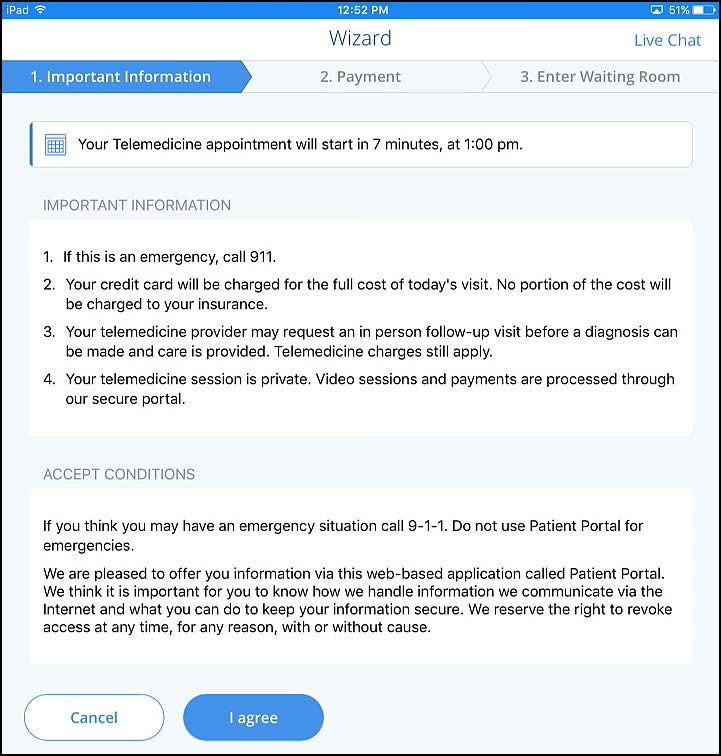
2. After the patient enters the appointment code, the Important Information screen opens, where they must agree to the conditions before continuing. Selecting Cancel returns the patient to the telemedicine main screen.
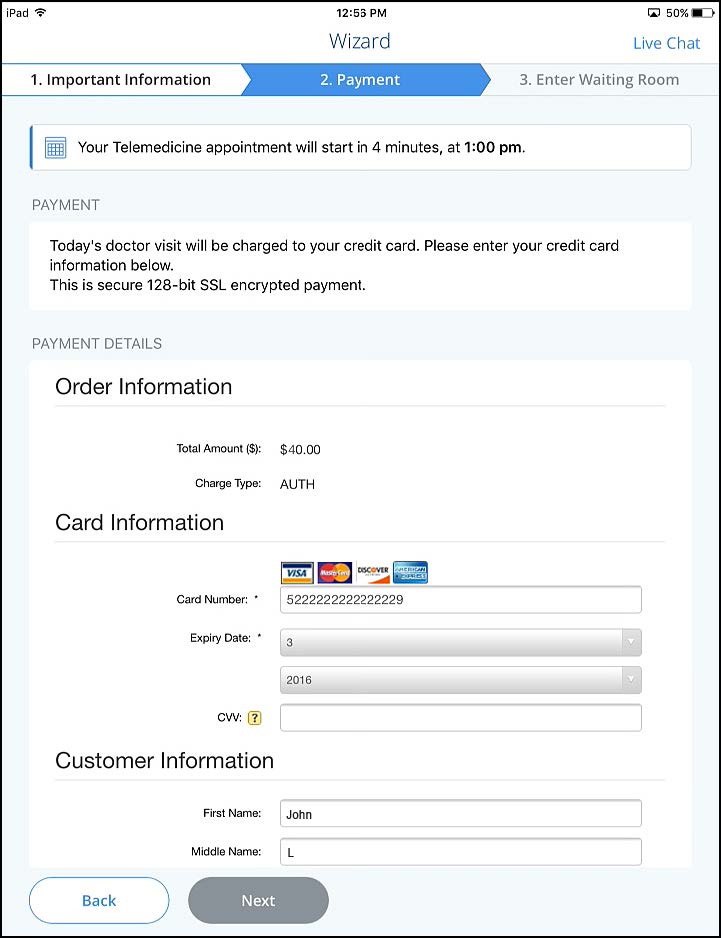
3. On the Payment screen, the patient enters payment information, and then taps Next.
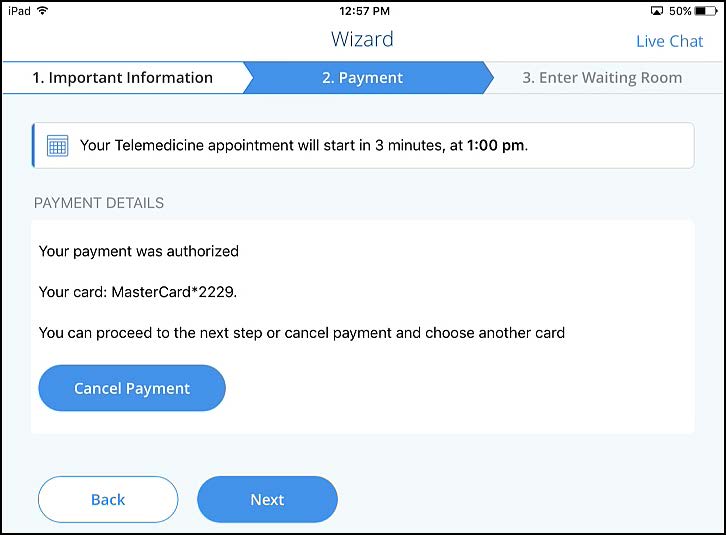
4. The Payment Details displays the payment status, and allows the patient to cancel the payment if necessary.
Tap Next to continue, or Cancel Payment to enter a different credit card.
Note: If the credit card payment is denied, the patient will be asked to enter a different credit card.
5. On the Enter Waiting Room screen, the patient enters the reason they are being seen by the doctor, and then taps Next.
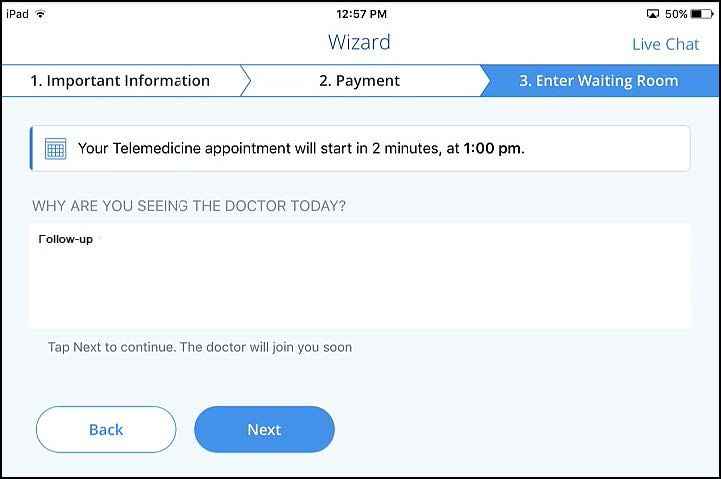
If the doctor has not yet connected to the session, the Waiting Room screen displays until the doctor joins the session.
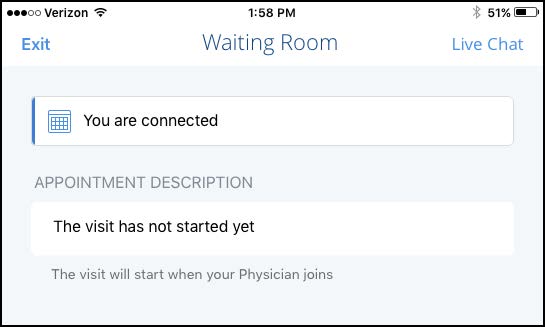
When the doctor joins the session, the patient will see the doctor on the screen.
When the call is complete, the patient’s credit card will be charged.
Message
If you need to contact the provider while you are waiting, click Messages.